Friday, October 30, 2009

Fri-DIY - Final Halloween Installment


It's the day before Halloween! Here are a few last great DIY ideas that you could still get done in time for tomorrow!

I love the nailhead pumpkins above. They are super stylish. They may not glow like a regular carved pumpkin, but I bet when surrounded by votive candles the metal reflects light interestingly.


I am totally in love with these apple. Which now that I write it, sounds pretty weird. Anyway, what's not to love about these super glossy bewitching apples?

The most awesome meat hand from Not Martha

Two words - meat hand. What else is there to say?


Templates from ehow

Ehow has a slew of downloadable pumpkin templates. I think one of the three above will be gracing my pumpkin this year.

Happy Halloween!!

Thursday, October 29, 2009

Gifts - Handmade Baby Bunny & Blanket

Day 289

I am one of 'those' people. I like to make things for people. When everyone else is flocking to some store to buy mass-produced gifts, I am toiling away in my workroom. I am sure I have frustrated/confused recipients of some of my gifts. Like the bunny and blanket combo I made for my cousin's baby shower. I think its adorable and hope she will like it, but who's to say she wouldn't have preferred something from her registry at babies r us?

Handmade baby gift

The softie is inspired by mini moopy. You can buy the original pattern here. I must have downloaded it ages ago, though, because it was free then! My softie is bigger than moopy and no felt face, just a cute little felt nose.

The blanket was super easy, just a piece of super soft bumpy fabric and a piece of vintage linen sewn together. I found a great tutorial for baby blankets over at sew4home. Next time I will be more ambitious in the blanket department.

Monday, October 26, 2009

Meatless Monday - Couscous with Roasted Squash and Preserved Lemons

Day 286

The husband and I set out to make preserved lemons a few weeks ago. Then we realized we had a whole jar of preserved lemons and nothing to do with them. A quick search turned up this recipe, which I adapted slightly based on what we had in the pantry. While a little labor intensive, the dish turned out very tasty, one of those terrific recipes where everything is represented - tart, savory, sweet, salty. Delicious. We ate it as a main course for meatless Monday, but it would be great served with any kind of roasted meat, too.

1 medium sized butternut squash, peeled and seeded, cut into 1/4 inch dice
2 Tablespoons vegetable oil
10 ounces dry couscous
1 large onion, cut into 1/4 inch dice (are you seeing a pattern here?)
1/4 cup chopped fresh parsley
1/2 preserved lemon, flesh removed, peel cut into 1/4 inch dice
1/4 cup pine nuts
1/4 cup raisins
1/4 tsp ground cinnamon
salt and pepper to taste

Couscous w/ preserved lemon

Preheat oven to 475. Line a baking sheet with foil. Toss butternut squash with 1 Tablespoon oil and spread in even layer on baking sheet. Roast in oven for 15 minutes, or until squash is tender. Dump squash into a large bowl.

Cook couscous according to manufacturer's directions. Toss with a fork and add to bowl with squash.

Meanwhile, heat remaining Tablespoon of oil in a medium skillet over medium-high heat. Add onion and cook until it begins to turn golden, about 5 minutes. Add onion to couscous mixture.

Return skillet to stove top and toast pine nuts over low heat until golden, about 3-4 minutes. Add to bowl with couscous mixture.

Add all remaining ingredients to couscous and toss well to combine. Serve either hot, room temperature, or cold.

Homemade preserved lemons

For anyone interested, we got the recipe for preserved lemons from this book. All I can attest is we made them, ate them, and didn't die. They were actually very tasty, though felt disgustingly slimy. I think Sunday Supper's recipe looks much prettier, though. I will be trying their way next.

Friday, October 23, 2009

Fri-DIY


Fun homemade curtains from mypapercrane. These would be easy to recreate or just cut out paper silhouettes and tape them up for a similar look.


Pretty cool skull necklace from Craft Stylish

The Swell Life put together 24 Halloween crafts in 24 hours. Some of them are really fun, I especially like the veggie head for a party.

Tuesday, October 20, 2009

How To - Write a Thank You Note


With the holiday season nearly upon us, again, I thought a refresher in the art of writing a thank you note might be timely.

Thank you notes are dear to my heart. Growing up in my family, every gift received required a written thank you. Nothing else was done until the note was written, addressed, stamped, and mailed. Christmas mornings found my siblings and I crowded around the kitchen table scribbling out our thanks. Our poor toys spilled half opened from their boxes, just waiting for us to play...after the notes, of course.


I have proudly carried the tradition into adulthood. However, among the 30 and under age group, I have found proper thank you notes are not always a given. With the popularity of email and text messaging, it's easy to zip out a quick 'Thx 4 gift.' I am firmly of the opinion that taking the time and effort to write a real note is the only polite way to respond to a gift. Anything less, even if more convenient, is frankly rude.

The great thing is, writing a thank you note is EASY! A few quick lines, a stamp, and all done, politeness upheld. Plus, the amount of really beautiful, charming, even amusing note cards available is staggering. So grab a stack and a nice pen and let's get started.


First, when is a written thank you necessary? A thousand etiquette books will yield a thousand different answers. This is the rule I personally adhere to: If someone has gone out of their way to do something specifically for ME and spent time or money, I write a thank you note.

Now, there are a few exceptions. Thank you notes to significant others are not always required. I am not advocating taking gifts from husbands, wives, or boyfriends for granted, but those relationships are very intimate and I assume thanks are being given in different ways.


Host or hostess gifts do not require a thank you note. Every bottle of wine or bouquet of flowers received in exchange for a meal or party can be properly accepted and thanks given verbally on the spot. However, a guest at a party or meal should send a thank you to the host afterwards IF no small gift was brought to the gathering for the host. Or, just send one anyway because every host would love getting a note after a party expressing thanks. It's a nice thing to do.

At work, yearly bonuses do not require thank you notes. Tins of cookies or popcorn, especially if everyone gets one, do not require thank you notes. Gift cards, personal checks, tickets to a show or dinner out DO require a written thank you.


A thank you note should be written in ink, preferably in cursive, on a new card. A 'new' card may seem like a given, but I once received a thank you written on the back of another card that had been torn in half. Seriously. And don't use pencil, it shows a weakness of will.

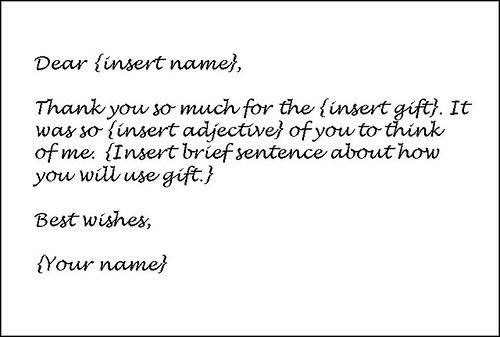
Keep it short and sweet. I usually stick to the following template:

Thank You Samples

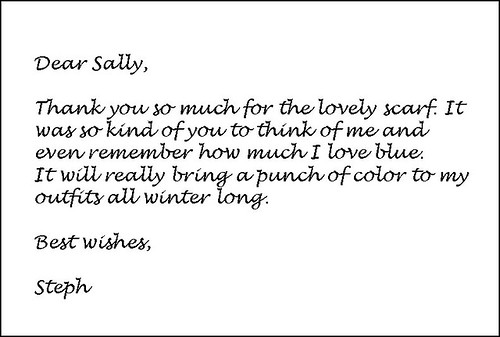
That's it! Here's a sample thank you for a gift of a scarf from a friend.

Thank You Samples

So now you are prepared to go forth and protect one bastion of politeness from being overrun and forgotten in our technology driven society. Pens and note cards at the ready!

Monday, October 19, 2009

Meatless Monday - Green Beans with Marinated Goat Cheese

Green beans with Goat Cheese

Summer is sadly over. No more tomatoes, no more fresh summer squash. Green beans, though, seem to be one of those crops that doesn't suffer too much through the seasons. Even in the dead of winter, the green beans at the local grocery will still be crisp and tasty. I have no idea where they are coming from and it doesn't go well with the philosophy of eating seasonally and locally, but sometimes a blanched green bean is just the fresh vegetable to remind me that summer is coming back some day.

This recipe is an interesting mixture of flavors and textures. It wouldn't say no to the addition of a little lemon zest to the marinade. We ate very hearty portions as a main dish, but it would pair well with most any chicken or pork main dish.

3-4 ounces chevre (fresh goat cheese) cut into 4, 1/2 inch thick rounds
3 Tablespoons olive oil
1/2 tsp. fennel seeds
1/2 teaspoon dried thyme
1 lb. green beans, trimmed
1/4 cup walnut pieces, toasted

Place cheese rounds in a shallow dish. Combine oil, fennel and thyme in a small bowl. Pour over cheese and let marinate for at least 20 minutes.

Cook green beans in a large pot of boiling water for about 5 minutes until tender and crisp. You may either dip them in a ice bath and have a cold salad, or just drain and serve warm.

Place 1/2 green beans in a layer on each plate. Top with two rounds of goat cheese and drizzle marinade over cheese and beans.

Top each plate with toasted walnuts and serve. These proportions served 2. To serve four, use only 1 round of goat cheese per serving.

Friday, October 16, 2009

Fri-DIY


I have heard that Halloween is Martha Stewart's favorite holiday. Her website certainly reflects it with the sheer volume of great Halloween ideas posted there! Here are a couple that would be fun to try out this year.

The floating treats above make me giggle. Not the easiest of all projects, but I think worth the effort.


Scary message luminaries
. Quick and easy, these would create a big impact lining the walk to the front door for a party.


Creepy Candy Jars. Download the templates, print on to sticker paper, and label away!


This one made the husband and I laugh out loud. Nothing says Happy Halloween like a pumpkin puking candy into a child's hand.

Monday, October 12, 2009

Meatless Monday - Scrambled eggs with smoked salmon and basil

Scrambled eggs with smoked salmon and basil

This recipe is a study in frugality. The smoked salmon it calls for IS expensive. However, it needs such a small amount for a big payoff in flavor. The eggs and basil star in supporting roles to the salmon and really let the smokey, delicate fish shine through.

Somehow, this tastes more decadent than the combination of ingredients suggests. The basil makes it incredibly fragrant, the fish heady and salty, but the cream cheese is the secret to the texture of this dish. The addition of the cream cheese makes the eggs so velvety and, frankly, creamy. The first bite lets you know this dish is in a totally different league than the eggs that come with pancakes at the local breakfast joint.

We've eaten this for a special breakfast, but it would also be great for a brunch, or light dinner. Next time you have overnight guests, save some pennies and serve this dish instead of bagels and lox. I don't think there will be any complaints.

Ingredients given PER PORTION. Increase as necessary.

1/2 Tablespoon butter
2 eggs, lightly beaten
1 Tablespoon cream cheese, cut into small squares
2 Tablespoons chopped smoked salmon
1 Tablespoon chopped fresh basil
salt and pepper to taste

Melt butter in a skillet over medium heat. Add eggs and let cook until bottom of eggs just begins to set.

Sprinkle cream cheese over eggs and stir to combine. Allow to cook until eggs are almost done, then sprinkle salmon and basil over skillet, folding into the eggs. Add salt and pepper to taste and serve immediately.

Friday, October 9, 2009

Fri-DIY


This week's Fri-DIY is chock full of great (and easy!) Halloween ideas. I am totally in love with the Halloween garland from paper crave. She has generously provided the illustrations to print at home so we can each make our very own!


I think these graveyard pots de creme are adorable. I don't usually advocate cheating, but those little pre-made chocolate pudding cups would be great spruced up like this.

Very cute pumpkin ornaments from Hostess with the Mostess.


Better Homes and Gardens has instructions to make these cute mummy heads. Obviously this project would not be safe with real candles, but pick up a few of those inexpensive battery powered votives for the same effect.


Great tutorial for packing tape transfers over at How About Orange. She made these spooky votives, but they would be great on glasses for a party or decorating a tray or mirror.

Tuesday, October 6, 2009

Dress Up - Vintage Style Dresses


I am loving the vintage style dresses over at Vintage Dress Outlet. Great prices, too! Too bad I didn't find them a few weeks ago before I got myself knee-deep in a sewing project to make a vintage style full skirt! (PS - Tutorial I am following to make the skirt is here.)


Monday, October 5, 2009

Recipe - Meatless Monday - Recipes from around the web


I have a major backlog of pictures stuck in limbo on my camera, including some of recent successful recipes. So until I make myself upload, here are a few recipes for Meatless Monday from around the web.


Thursday, October 1, 2009

Fri-DIY


I have to admit, I love Halloween. So all of October's Fri-DIY's will lean heavily towards the most bewitching of holidays.

The pic above is from a girl's night Halloween party, which frankly sounds pretty cool. Better Homes and Gardens's slide show is chock full of great DIY ideas, from the hot pink pumpkins and skulls (break out that spraypaint!) to using cheap-o plastic skull rings as wine charms.


Green and creepy! Spooky terrariums made from old jars. These would be great grouped together on a mantel or entry table with some flickering votive candles.


Super awesome cobweb placemats and doilies! From Eddie Ross. Yes, he's obnoxious, but I give him his due for coming up with some great Halloween ideas.

And on just a fall note, here's a pretty rustic centerpieces from Once Wed. Perfect for a fall table.

Parties - Easy Ideas from Real Simple


Real Simple has an informative slideshow about using 50 ordinary items in new ways. Normally I skip right over things like that, but this one is beautifully photographed and actually has some original tips. Some of them are kind of dumb (plastic bags around the knees while gardening?), but there were several helpful ideas for entertaining and decorating.

Pictured above it a 6-pack holder transformed into a picnic caddy for utensils and napkins. Cute idea for a picnic or barbecue. I could see taking this one step farther and gluing pretty paper to the sides and top.


Another great idea for a drink station at a party or barbecue. Put a colander filled with ice over a bowl to catch the water as the ice melts. I would probably use a wider more shallow bowl than pictured above as it looks a little precarious to have the colander floating mid-air.


This tip was to use rubber bands to keep cold glasses with condensation slipping out of your hand. Is this really a big enough problem that a helpful hint needed to be thought up? I like this idea for marking glasses at a party. A big bag of colored rubber bands would last a few parties at least!


I really liked this idea of using window clings for marking glasses as well. Normally, I tie pretty ribbons or paper cut outs to glasses to mark them, but what to do when using glasses without stems? One of these two tips will be put to good use at my next party!