Showing posts with label gifts. Show all posts

Friday, March 26, 2010

Fri-DIY - Gifts to Make (Happy Birthday to me!)

I realized today that I never posted a Meatless Monday this week. However, today I turn the big 3-0, so I am going to cut myself some slack.

In honor of myself (hey, it's my blog, I can do that!) here are some great tutorials I would like to make and give to myself as birthday presents.


Pretty pretty leaf cuff from maya*made
. My leather scraps and vintage buttons are demanding to be made in to several of these!


A lovely set of spring-time napkins from Purl Bee. This tutorial has a fantastic explanation for how to do ric-rac trim. I've never tried trim before because I was afraid a lot of cursing would ensue. However, now I think I should be able to master it!


A twirly patch-work skirt courtesy of Moda Bake Shop
. Yes, this is for a child, but I could adapt for a grown up. I love love the colors used for the tutorial!

Happy crafting!

Friday, December 18, 2009

Fri-DIY - Gift Packaging


Christmas is nearly upon us! I hope all of your presents are made or purchased and awaiting the final gift wrap touch. A great present is so much better when wrapped with extra attention. AND beautifully wrapped presents look so much better peeking out from under a tree or handed to someone special. This week's Fri-DIY has some lovely and easy ways to amp up the anticipation of unwrapping a present.

I love the combination of fabric and paper for the gift tags above. She handily provided her cute template to download, but these could be made from scratch easily enough as well. Heck. you don't even need the fabric, use a piece of the wrapping on the present and be super coordinated!


Peapods idea to recycle old catalogs into gift tags is pretty, practical, and earth friendly. Santa likes it when we recycle. I love that she used a punch, but circle or rectangles would be just as nice.


If things are just TOO busy to craft pretty packaging, Domestifluff has kindly offered her adorable printable gift tags for free! Print, cut and stick.


And for even more ideas, head over to The Martha for a slide show of over 70 gift wrap ideas!

Friday, December 11, 2009

Fri-DIY


This week's Fri-DIY brings together tutorials to make some great last minute gifts. Christmas and Hanukkah are right around the corner and who isn't strapped for both cash and time right now. These gifts could be whipped up this weekend and be ready to go. Next week I'll have a collection of fantastic gift wrapping ideas to wrap these cuties up.

There are so many things to do with a simple drawstring bag. Happy Things tutorial is very easy to follow even for a beginning sewer. See the notes at the bottom of her post for ideas how to finish the inside seams to make it a little tidier for gift-giving. Make a bunch give them to your friends who travel a lot. They are great for stowing shoes, bathing suits, or dirty laundry in a suitcase.


For friends who imbibe, why not try this interesting recipe for Skittles Vodka. Seriously, it just looks cool. Make one big batch and then put in small bottles to share the rainbow of vodka.


I love this idea to re-use vintage earrings as magnets. If you have some laying around, this project is super easy to complete, probably taking a half hour or less for a set of ten. Think how pretty they would be on your favorite fashionista's fridge.


Finally, a customized clipboard would make a great gift for a teacher, a writer, or a super-organized list-loving woman (ahem). Skip to my Lou shows two different techniques for making this adorable gift.

Scissors sharpened and at the ready!

Friday, November 20, 2009

Fri-DIY


How is it that Thanksgiving is just next week?? The gift-making and gift-buying time for Christmas is drawing short. I've put together a few gift ideas this week, like the gorgeous headband above from Jeannie over at Project Wedding, a stress-free Thanksgiving idea, and a lovely advent calendar. Get those scissors and Sharpies ready!


I love these Thanksgiving place cards from the Pink of Perfection. They are three of my favorite things - lovely, simple, and free. Send the kids out to gather the leaves, write the names, and scatter on the table. Beautiful.


The purl bee has another wonderful craft tutorial - mini patchwork pin cushions. Make a bunch this weekend and have a pretty gift for every sewer you know!


Finally, the wonderful crew over at Mibo have made a fantastic advent calendar. For free! This lovely gem is just an email away. Also check out their adorable Christmas Creatures, they make me smile.

Thursday, October 29, 2009

Gifts - Handmade Baby Bunny & Blanket

Day 289

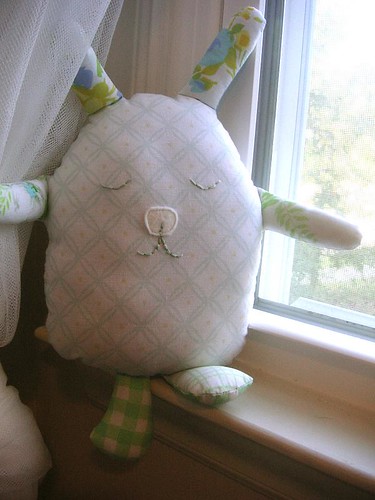
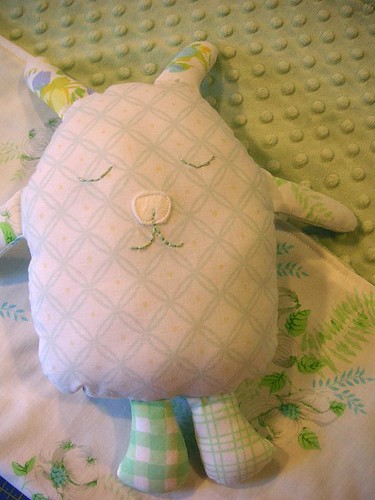
I am one of 'those' people. I like to make things for people. When everyone else is flocking to some store to buy mass-produced gifts, I am toiling away in my workroom. I am sure I have frustrated/confused recipients of some of my gifts. Like the bunny and blanket combo I made for my cousin's baby shower. I think its adorable and hope she will like it, but who's to say she wouldn't have preferred something from her registry at babies r us?

Handmade baby gift

The softie is inspired by mini moopy. You can buy the original pattern here. I must have downloaded it ages ago, though, because it was free then! My softie is bigger than moopy and no felt face, just a cute little felt nose.

The blanket was super easy, just a piece of super soft bumpy fabric and a piece of vintage linen sewn together. I found a great tutorial for baby blankets over at sew4home. Next time I will be more ambitious in the blanket department.

Tuesday, October 20, 2009

How To - Write a Thank You Note


With the holiday season nearly upon us, again, I thought a refresher in the art of writing a thank you note might be timely.

Thank you notes are dear to my heart. Growing up in my family, every gift received required a written thank you. Nothing else was done until the note was written, addressed, stamped, and mailed. Christmas mornings found my siblings and I crowded around the kitchen table scribbling out our thanks. Our poor toys spilled half opened from their boxes, just waiting for us to play...after the notes, of course.


I have proudly carried the tradition into adulthood. However, among the 30 and under age group, I have found proper thank you notes are not always a given. With the popularity of email and text messaging, it's easy to zip out a quick 'Thx 4 gift.' I am firmly of the opinion that taking the time and effort to write a real note is the only polite way to respond to a gift. Anything less, even if more convenient, is frankly rude.

The great thing is, writing a thank you note is EASY! A few quick lines, a stamp, and all done, politeness upheld. Plus, the amount of really beautiful, charming, even amusing note cards available is staggering. So grab a stack and a nice pen and let's get started.


First, when is a written thank you necessary? A thousand etiquette books will yield a thousand different answers. This is the rule I personally adhere to: If someone has gone out of their way to do something specifically for ME and spent time or money, I write a thank you note.

Now, there are a few exceptions. Thank you notes to significant others are not always required. I am not advocating taking gifts from husbands, wives, or boyfriends for granted, but those relationships are very intimate and I assume thanks are being given in different ways.


Host or hostess gifts do not require a thank you note. Every bottle of wine or bouquet of flowers received in exchange for a meal or party can be properly accepted and thanks given verbally on the spot. However, a guest at a party or meal should send a thank you to the host afterwards IF no small gift was brought to the gathering for the host. Or, just send one anyway because every host would love getting a note after a party expressing thanks. It's a nice thing to do.

At work, yearly bonuses do not require thank you notes. Tins of cookies or popcorn, especially if everyone gets one, do not require thank you notes. Gift cards, personal checks, tickets to a show or dinner out DO require a written thank you.


A thank you note should be written in ink, preferably in cursive, on a new card. A 'new' card may seem like a given, but I once received a thank you written on the back of another card that had been torn in half. Seriously. And don't use pencil, it shows a weakness of will.

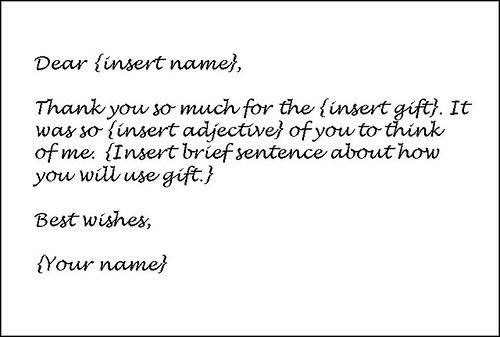
Keep it short and sweet. I usually stick to the following template:

Thank You Samples

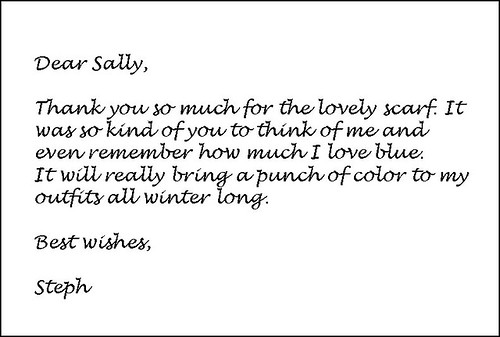
That's it! Here's a sample thank you for a gift of a scarf from a friend.

Thank You Samples

So now you are prepared to go forth and protect one bastion of politeness from being overrun and forgotten in our technology driven society. Pens and note cards at the ready!
Thursday, October 1, 2009

Fri-DIY


I have to admit, I love Halloween. So all of October's Fri-DIY's will lean heavily towards the most bewitching of holidays.

The pic above is from a girl's night Halloween party, which frankly sounds pretty cool. Better Homes and Gardens's slide show is chock full of great DIY ideas, from the hot pink pumpkins and skulls (break out that spraypaint!) to using cheap-o plastic skull rings as wine charms.


Green and creepy! Spooky terrariums made from old jars. These would be great grouped together on a mantel or entry table with some flickering votive candles.


Super awesome cobweb placemats and doilies! From Eddie Ross. Yes, he's obnoxious, but I give him his due for coming up with some great Halloween ideas.

And on just a fall note, here's a pretty rustic centerpieces from Once Wed. Perfect for a fall table.

Tuesday, August 4, 2009

How To - Girly Coozies

Day 196

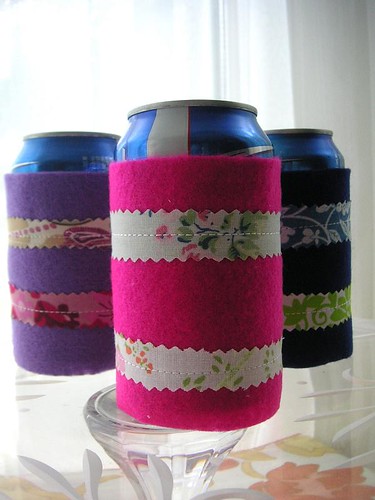
I have a new friend who recently complained that I hadn't made something for her yet. BUT things have been busy, so I couldn't launch into a huge project. I came up with these cute felt coozies as a super quick solution. They don't have bottoms to them, but we didn't have a problem with the cans slipping through when gave them a test run.

Materials needed:
8.5" x 11" pieces of felt, assorted colors
fabric scraps
rotary cutter
pinking shears
sewing machine
thread

Cut the felt into strips 8.5" x 4" using the rotary cutter. Cut the fabric scraps into strips 3/4" x 8.5" using the pinking shears. Layout 2 fabric scrap strips on to the felt and sew down. Fold the felt strip in half with the fabric strips facing in. Sew together with 1/2" seam. Flip coozie right side out and enjoy a frosty beverage!


Thursday, April 2, 2009

How To - Fabric Lined Envelopes

Fabric Lined Envelopes

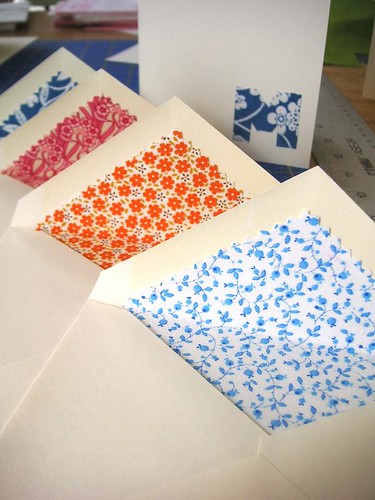
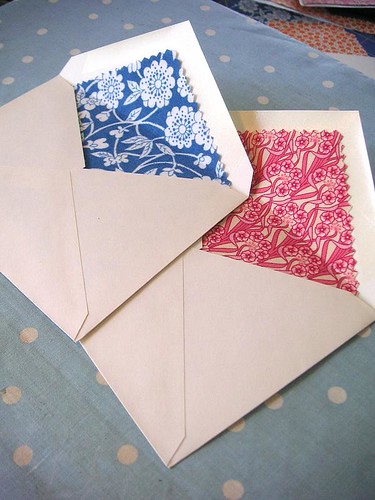
One of my best friends has a BIG weekend coming up - her birthday, bridal shower (I'm hosting, so more on that soon!), and bachelorette party all wrapped in three days. So, I made her a set of blank notecards for her birthday and lined them with cute fabric. The fabric is a little unexpected twist on traditional paper lined envelopes. I think they add a good dose of flair and style to any correspondence.

Fabric Lined Envelopes

The process is pretty simple. Start by tracing the outline of the envelope with the flap open. Then cut out a template about 1/2 inch smaller than the envelope. Cut a piece of lightweight cotton fabric large enough for the template, I fit two per piece of fabric in the sample photos.

Fabric Lined Envelopes

Next, cut a piece of paper-backed heat fusible fabric webbing (Wunder Under or the like, for lightweight fabrics) slightly smaller than the piece of fabric. Fire up the iron to medium-high and iron the fabric to get rid of any wrinkles. Let the fabric cool off, then place the fusible webbing rough side down on the wrong side of the fabric and paper side up. Press and hold the DRY iron in one spot fo 10-12 seconds to melt the glue to the fabric. Pick up the iron and move to the next spot and repeat pressing for another 10-12 seconds. Continue across the fabric in the same manner until all the webbing is fused.

Fabric Lined Envelopes

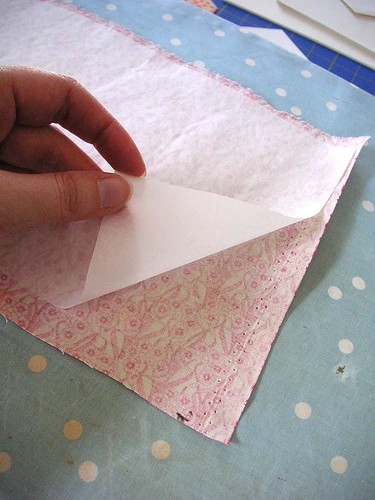
Let the fabric cool off to set the adhesive. Then carefully pull the paper backing away. The adhesive should be firmly attached to fabric and feel slightly rubbery.

Fabric Lined Envelopes

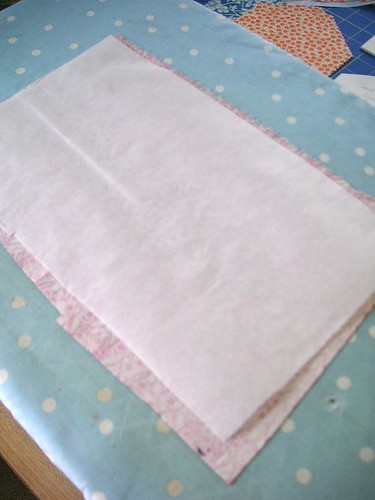
Now, cut a piece of white tissue paper slightly larger than the fabric. Using the iron, repeat the pressing and holding to adhere the glue and fabric to the tissue. It will take a little less time than the first one, only about 5-7 seconds each pressing.

Fabric Lined Envelopes

Now the fabric is offcially paper-backed and very very handy to have around. To finish up, trace the template made in step one on to the tissue side of the fabric and cut out. I used pinking shears just because I like them, but straight scissors will work, too. The fabric shouldn't fray because of the glue.

Open the envelope and insert the liner. Fold the fabric over exposing the flap of the envelope and run a glue stick over the area the liner will cover. Press the fabric firmly over the glue then fold the flap down to crease the fabric. Ta-da, all done. Mail at will!

Monday, March 9, 2009

Home Style - Silhouetted Wood Coasters


If I could marry these, I think I would...

Saturday, February 7, 2009

Gifts - Personalized Valentines


Sigh, I love this idea. I love everything about it, the personalization, her style, the intimacy of her photos. I also love that I love it and though the husband would think it strange if I purchased one for him, he would display it anyway. Lucky for him I've already purchased his gift. Perhaps for his birthday...

all images from Aubrey Trinnaman
found via Kids and Cocktails

Tuesday, December 16, 2008

Gifts - Nearly Last Minute Ideas


There is still time to order last minute gifts from some great shops online. Wouldn't that be better than braving the mall? I've pulled together a selection of picks that would make great gifts AND are not too expensive.

The glassware above is Heavenly Glass from Rosanna Inc. It's just lovely. I also like that it is more winter themed than specifically Christmas. It could be proudly displayed and used right up till spring. Some of the pieces are already sold out, but the votives and bottles are still available. BONUS - Free 3-day shipping going on right now at Rosanna, Inc.


These gardening gloves from Hable Construction are adorable. They come in 11 different color/patterns, too. They'd be a great gift for the gardener on your list OR perhaps someone who has just moved out on their own.

I love love love these whimiscal candle holders from Art Dept. Everything they make is great. If the candleholders don't speak to you, check out their jewelry, tiles, or letters instead.


I giggled out loud when I saw this apron at Vintage June. It's funny, in a sick sort of way. Perfect for any man who thinks he is a grill master.

I find the pop-able calendar intriguing. It IS kind of a brilliant idea. Who doesn't enjoy popping bubble wrap? It would be like a little treat every morning.
Good luck with any remaining shopping! Let me know in the comments if you have any other suggestions or have found a great deal.


Monday, December 8, 2008

Gifts - 2009 Calendars


Forgive me, I have been a bad bad blogger. The holiday season has me in it's clutches and I've been running around in a manner similar to a headless chicken. I did decorate the house for the holidays this weekend. I'll snap some pics and put them up soon.

The gift countdown has already begun. Still have some shopping to do, though? I've picked out some gorgeous calendars that would make great gifts. I know, I know, calendars are BORING, right? I have to disagree. All of these are gorgeous and anyone would be lovely gracing someone's desk.

image from Etsy seller littlebrown pen

This one cracks me up. PLUS you can actually print this one at home, how great is that?
image from Whimsy Press

I love everything Whimsy Press does, and this calendar is no exception.

image from Papayalicious

I think even I would be inspired to keep organized with this lovely calendar from Papyalicious.

image from See Jane Work

I love this one for it's cute designs and the unique way to stand it up (and handy pen/pencil holder).

Tuesday, December 2, 2008

Gifts - penandpaper at Etsy


I am loving this series from penandpaper over at Etsy! They fit so well into my personal collection of girls with birds in their hair, I had to snatch one up for myself. She does such lovely work. Many of her pieces would be a sweet gift for a mom or sister this holiday season. Or just for yourself, like me! Go check her out and maybe you can check someone off your shopping list.