Showing posts with label holidays. Show all posts

Friday, July 2, 2010

Fri-DIY - Tissue Paper Flowers

Tissue Paper Flowers

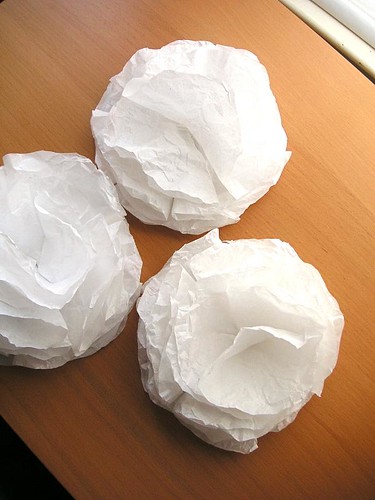
I am in the midst of planning an engagement party for some very dear friends. As such, I have been happily sequestered in my craft room for many hours working on decorations, invitations, and plans in general. These are some flowers I created that will be gracing the entry walls en masse the evening of the party.

The flowers are super quick to make, about 5 minutes per flower, and don't require any special crafting tools. What you do need is:

Tissue paper in the color of your choice
Scissors
Hot glue gun
Tissue Paper Flowers

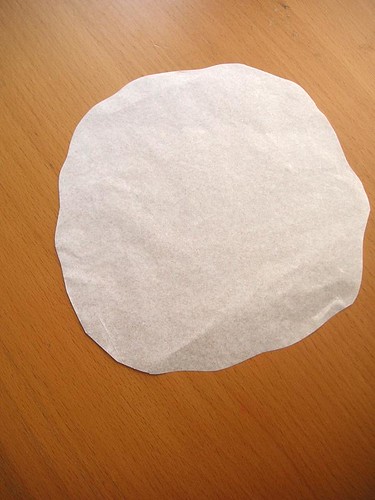
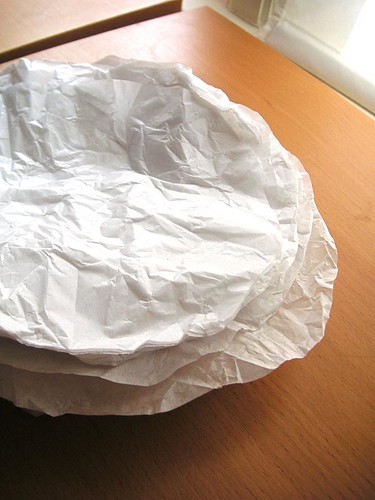
Cut out 6 inch circles from the tissue, scalloping the edges slightly as you cut. You will need 11 circles per flower.
Tissue Paper Flowers

Once you've got a nice stack, crumple them all up and gently smooth back out. This step is important so the flowers have some nice volume and texture and don't end up looking flat.
Tissue Paper Flowers

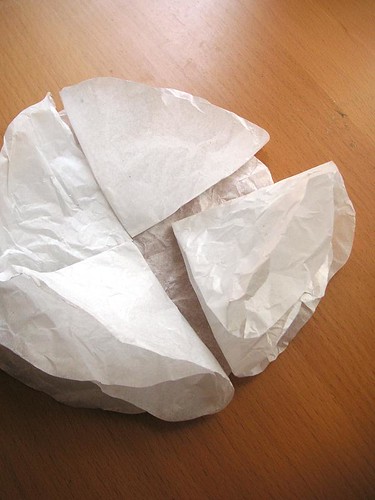
Heat up the hot glue gun. Lay one circle flat on your work space. Fold another circle in half, then in half again to make a wedge shape. Put a dab of hot glue at the point end of the wedge and glue to the flat circle. Repeat with 3 more circles to make the first layer.

Then do it again with 4 more circles but glue so they overlap the spaces between the wedges of the first layer.

Finally, take 2 more circles. Fold each in half, add a dab of glue at the middle of the fold and glue each to the flower. All done!

Tissue Paper Flowers

Along with party wall decorations, I have also used these to finish off a wrapped gift and as napkin holders for parties. I am sure you can come up with many more uses for them, too!

Wednesday, June 30, 2010

I like you - Sparklers


With the 4th of July right around the corner, I like most everything red, white, and blue. Sparklers hold a special place in my heart, though, pulling me back to the days of bare feet, and cool grass, and mosquito bites while running with a sparkly light through the front yard. I will be in a fire-works friendly state for the 4th this year, so I am looking forward to reliving part of my childhood via fiery lit sticks.


However, if you find yourself in an anti-sparkler state or town, consider trying one of the crafts below to get your sparkler fix. Best part is, no chance of burnt fingers!


Thursday, February 4, 2010

Fri-DIY: Valentines (A few days late)


Sorry for the late posting, I hosted a party on Friday evening and ran out of time to finish this post up prior to going in to full-on party mode. I'm planning on posting pics of the party sometime this week.


Truth be told, I am not a big Valentine's Day fan. All that mushy nonsense sentiment doesn't make a whole lot of sense to me. Have you read a Valentine's card recently? Sheesh!

However, I do like pink and hearts, so here are a few DIY projects from around the web that aren't too mushy-mushy! Like the sweet straw download from Papermash. Which is free, so generous!


How About Orange strikes gold again with this super sweet heart garland. The hearts would also be fun taped to walls and windows or covering a wrapped package.


Everything about this letter project from Paper N Stitch is adorable. She used wooden spools made for crafts, but these would be wonderful on recycled spools leftover from sewing. This project could also be adapted and use paper for the 'letter' part, which would eliminate the need to stamp the message.


Another example of a sewn paper garland from Oh So Crafty, because you know I am a sucker for a sewn paper garland. RECYCLING BONUS - she uses magazine pages for the hearts.


How much fun is this homemade flip book from Color me Katie? So sweet and clever.

Happy Valentine's Day crafting!

Friday, December 18, 2009

Fri-DIY - Gift Packaging


Christmas is nearly upon us! I hope all of your presents are made or purchased and awaiting the final gift wrap touch. A great present is so much better when wrapped with extra attention. AND beautifully wrapped presents look so much better peeking out from under a tree or handed to someone special. This week's Fri-DIY has some lovely and easy ways to amp up the anticipation of unwrapping a present.

I love the combination of fabric and paper for the gift tags above. She handily provided her cute template to download, but these could be made from scratch easily enough as well. Heck. you don't even need the fabric, use a piece of the wrapping on the present and be super coordinated!


Peapods idea to recycle old catalogs into gift tags is pretty, practical, and earth friendly. Santa likes it when we recycle. I love that she used a punch, but circle or rectangles would be just as nice.


If things are just TOO busy to craft pretty packaging, Domestifluff has kindly offered her adorable printable gift tags for free! Print, cut and stick.


And for even more ideas, head over to The Martha for a slide show of over 70 gift wrap ideas!

Tuesday, December 8, 2009

Freebie - Christmas Stickers

Christmas Stickers Traditional

Tis the season of giving, so here are some cute Christmas stickers I designed. Stick them on presents, to close holiday cards, or on anything that needs some holiday cheer. I've made them in traditional colors and in brighter colors, if you prefer something more hip. Enjoy!

Christmas Stickers Bright

Friday, December 4, 2009

Fri-DIY


This week's Fri-DIY is full of inspiration for decking the halls this holiday season. I am so in love with the Rosette wreath above, but it seems like the kind of project that I would have needed to start last June! I think it would also look great done in tissue paper. Maybe that could speed the process along?


Never pay money for gift bows again thanks to the great tutorial over at How About Orange. She always has great ideas, but this one really is a winner.


Martha's pretty idea marries art and twinkle lights. The perfect solution for a dark corner in need of some Christmas spirit.


While cutting strips for the gift bows, cut a few more to make these pretty paper ornaments. I'm planning on making them supersized and hanging from the ceiling this year.

Happy crafting!

Friday, November 20, 2009

Fri-DIY


How is it that Thanksgiving is just next week?? The gift-making and gift-buying time for Christmas is drawing short. I've put together a few gift ideas this week, like the gorgeous headband above from Jeannie over at Project Wedding, a stress-free Thanksgiving idea, and a lovely advent calendar. Get those scissors and Sharpies ready!


I love these Thanksgiving place cards from the Pink of Perfection. They are three of my favorite things - lovely, simple, and free. Send the kids out to gather the leaves, write the names, and scatter on the table. Beautiful.


The purl bee has another wonderful craft tutorial - mini patchwork pin cushions. Make a bunch this weekend and have a pretty gift for every sewer you know!


Finally, the wonderful crew over at Mibo have made a fantastic advent calendar. For free! This lovely gem is just an email away. Also check out their adorable Christmas Creatures, they make me smile.

Friday, October 30, 2009

Fri-DIY - Final Halloween Installment


It's the day before Halloween! Here are a few last great DIY ideas that you could still get done in time for tomorrow!

I love the nailhead pumpkins above. They are super stylish. They may not glow like a regular carved pumpkin, but I bet when surrounded by votive candles the metal reflects light interestingly.


I am totally in love with these apple. Which now that I write it, sounds pretty weird. Anyway, what's not to love about these super glossy bewitching apples?

The most awesome meat hand from Not Martha

Two words - meat hand. What else is there to say?


Templates from ehow

Ehow has a slew of downloadable pumpkin templates. I think one of the three above will be gracing my pumpkin this year.

Happy Halloween!!

Friday, October 23, 2009

Fri-DIY


Fun homemade curtains from mypapercrane. These would be easy to recreate or just cut out paper silhouettes and tape them up for a similar look.


Pretty cool skull necklace from Craft Stylish

The Swell Life put together 24 Halloween crafts in 24 hours. Some of them are really fun, I especially like the veggie head for a party.

Tuesday, October 20, 2009

How To - Write a Thank You Note


With the holiday season nearly upon us, again, I thought a refresher in the art of writing a thank you note might be timely.

Thank you notes are dear to my heart. Growing up in my family, every gift received required a written thank you. Nothing else was done until the note was written, addressed, stamped, and mailed. Christmas mornings found my siblings and I crowded around the kitchen table scribbling out our thanks. Our poor toys spilled half opened from their boxes, just waiting for us to play...after the notes, of course.


I have proudly carried the tradition into adulthood. However, among the 30 and under age group, I have found proper thank you notes are not always a given. With the popularity of email and text messaging, it's easy to zip out a quick 'Thx 4 gift.' I am firmly of the opinion that taking the time and effort to write a real note is the only polite way to respond to a gift. Anything less, even if more convenient, is frankly rude.

The great thing is, writing a thank you note is EASY! A few quick lines, a stamp, and all done, politeness upheld. Plus, the amount of really beautiful, charming, even amusing note cards available is staggering. So grab a stack and a nice pen and let's get started.


First, when is a written thank you necessary? A thousand etiquette books will yield a thousand different answers. This is the rule I personally adhere to: If someone has gone out of their way to do something specifically for ME and spent time or money, I write a thank you note.

Now, there are a few exceptions. Thank you notes to significant others are not always required. I am not advocating taking gifts from husbands, wives, or boyfriends for granted, but those relationships are very intimate and I assume thanks are being given in different ways.


Host or hostess gifts do not require a thank you note. Every bottle of wine or bouquet of flowers received in exchange for a meal or party can be properly accepted and thanks given verbally on the spot. However, a guest at a party or meal should send a thank you to the host afterwards IF no small gift was brought to the gathering for the host. Or, just send one anyway because every host would love getting a note after a party expressing thanks. It's a nice thing to do.

At work, yearly bonuses do not require thank you notes. Tins of cookies or popcorn, especially if everyone gets one, do not require thank you notes. Gift cards, personal checks, tickets to a show or dinner out DO require a written thank you.


A thank you note should be written in ink, preferably in cursive, on a new card. A 'new' card may seem like a given, but I once received a thank you written on the back of another card that had been torn in half. Seriously. And don't use pencil, it shows a weakness of will.

Keep it short and sweet. I usually stick to the following template:

Thank You Samples

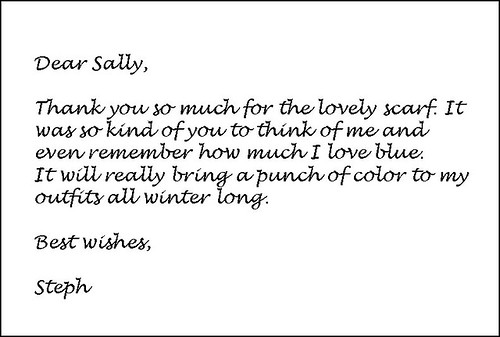
That's it! Here's a sample thank you for a gift of a scarf from a friend.

Thank You Samples

So now you are prepared to go forth and protect one bastion of politeness from being overrun and forgotten in our technology driven society. Pens and note cards at the ready!

Friday, October 16, 2009

Fri-DIY


I have heard that Halloween is Martha Stewart's favorite holiday. Her website certainly reflects it with the sheer volume of great Halloween ideas posted there! Here are a couple that would be fun to try out this year.

The floating treats above make me giggle. Not the easiest of all projects, but I think worth the effort.


Scary message luminaries
. Quick and easy, these would create a big impact lining the walk to the front door for a party.


Creepy Candy Jars. Download the templates, print on to sticker paper, and label away!


This one made the husband and I laugh out loud. Nothing says Happy Halloween like a pumpkin puking candy into a child's hand.

Friday, October 9, 2009

Fri-DIY


This week's Fri-DIY is chock full of great (and easy!) Halloween ideas. I am totally in love with the Halloween garland from paper crave. She has generously provided the illustrations to print at home so we can each make our very own!


I think these graveyard pots de creme are adorable. I don't usually advocate cheating, but those little pre-made chocolate pudding cups would be great spruced up like this.

Very cute pumpkin ornaments from Hostess with the Mostess.


Better Homes and Gardens has instructions to make these cute mummy heads. Obviously this project would not be safe with real candles, but pick up a few of those inexpensive battery powered votives for the same effect.


Great tutorial for packing tape transfers over at How About Orange. She made these spooky votives, but they would be great on glasses for a party or decorating a tray or mirror.