
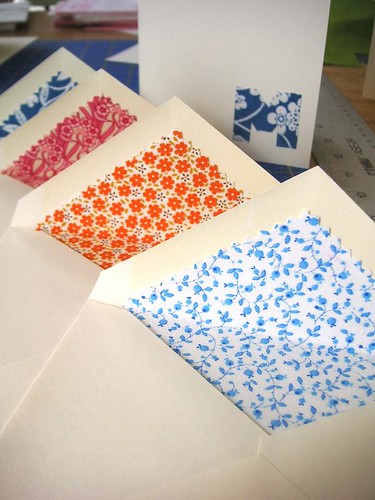
One of my best friends has a BIG weekend coming up - her birthday, bridal shower (I'm hosting, so more on that soon!), and bachelorette party all wrapped in three days. So, I made her a set of blank notecards for her birthday and lined them with cute fabric. The fabric is a little unexpected twist on traditional paper lined envelopes. I think they add a good dose of flair and style to any correspondence.

The process is pretty simple. Start by tracing the outline of the envelope with the flap open. Then cut out a template about 1/2 inch smaller than the envelope. Cut a piece of lightweight cotton fabric large enough for the template, I fit two per piece of fabric in the sample photos.
Next, cut a piece of paper-backed heat fusible fabric webbing (Wunder Under or the like, for lightweight fabrics) slightly smaller than the piece of fabric. Fire up the iron to medium-high and iron the fabric to get rid of any wrinkles. Let the fabric cool off, then place the fusible webbing rough side down on the wrong side of the fabric and paper side up. Press and hold the DRY iron in one spot fo 10-12 seconds to melt the glue to the fabric. Pick up the iron and move to the next spot and repeat pressing for another 10-12 seconds. Continue across the fabric in the same manner until all the webbing is fused.
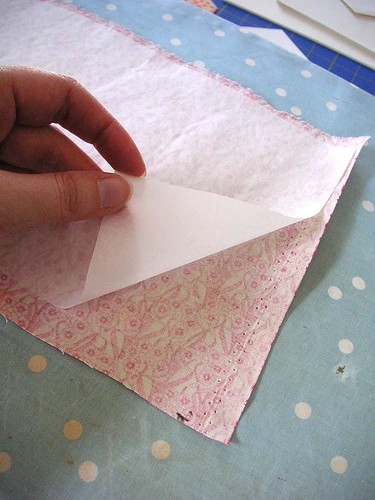
Let the fabric cool off to set the adhesive. Then carefully pull the paper backing away. The adhesive should be firmly attached to fabric and feel slightly rubbery.

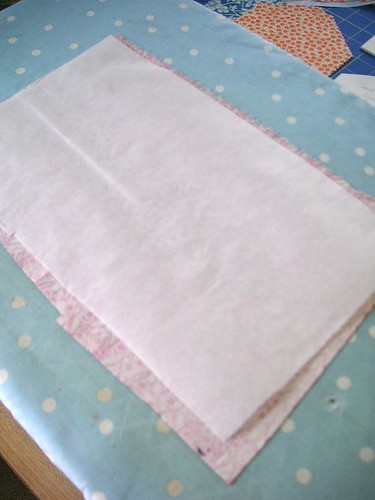
Now, cut a piece of white tissue paper slightly larger than the fabric. Using the iron, repeat the pressing and holding to adhere the glue and fabric to the tissue. It will take a little less time than the first one, only about 5-7 seconds each pressing.
Now the fabric is offcially paper-backed and very very handy to have around. To finish up, trace the template made in step one on to the tissue side of the fabric and cut out. I used pinking shears just because I like them, but straight scissors will work, too. The fabric shouldn't fray because of the glue.
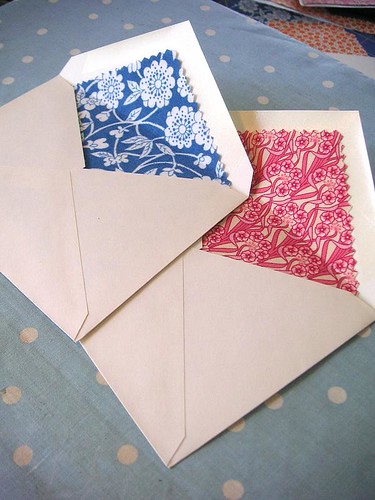
Open the envelope and insert the liner. Fold the fabric over exposing the flap of the envelope and run a glue stick over the area the liner will cover. Press the fabric firmly over the glue then fold the flap down to crease the fabric. Ta-da, all done. Mail at will!
Open the envelope and insert the liner. Fold the fabric over exposing the flap of the envelope and run a glue stick over the area the liner will cover. Press the fabric firmly over the glue then fold the flap down to crease the fabric. Ta-da, all done. Mail at will!
5 comments:
OMG, that's cute!!!
Hello there, your tutorial was great and I have a question for you if you don't mind? I just bought some fusible web to try out and I got "Steam a Seam2 Double Stick Fusible Web" from Jo Ann's. How is that different from paper backed fusible web as you mention in your tutorial? If I am fusing fabric to paper (say cardstock or text weight paper) what kind of fusible web to I need? Is light weight fine?
Sorry I know this is an old post of yours, but it was most helpful one a i came across on the web. Thanks!
Hey, Bukola. Glad you are giving it a try.
I'm not too familiar with that product, but it looks like from their website it's a pressure and heat sensitive adhesive. Since it's not paper backed, you can skip a step. Just cut the tissue and fabric the same size, stick the fusible web in between and iron following the fusible web's directions.
The kind of fusible webbing you need is really more dependent on the fabric than the paper. A thick fabric will need a heavier duty webbing. However, I usually have the most luck with lightweight cottons and the lightweight webbing works just fine for them.
I am working on some fabric correspondence envelopes. Different project, but similar creative train of thought. This is a lovely design!
Thanks, Kelli. Let me know how they turn out!
Post a Comment